Big Brakes on a not-so-big Budget? YEP

After looking back at the pics it's actually pretty clear what needs to be opened up, duuhh. That's what lack of sleep does for me. Not sure what I was thinking.

Nothing needs to be opened up, ground off yes.

You can't make a mistake....grind aluminum until the bracket holes line up with the factory holes. Doesn't get any easier.
 
Currently working on a complete write-up, but I'll wait until I return from the track tomorrow to finish it up. But to answer some key questions here and for anyone going forward for the install this weekend, here is some of my findings:

My backing plate did not need to be removed, no clearance issues. I'd guess about 8mm of clearance between the plate rivets and the rotor. I left mine on.

Grinding the caliper mount ears is very minimal and quick. I used a die grinder with a coarse resurface disc, your really just needing to polish off the edge of the ear, I did not remove more than 2mm of material.

The rotor centerbore was slightly more difficult, I used a die grinder with a carbide grinding bit. Go around a few times, then test fit the rotor, if it does not slide all the way on go around a few more times and repeat until it fits. The iron is more difficult to grind away.

Finally a big issue for me was caliper clearance aginst the wheels weights. My outer tape weights hit the fins at the end of the caliper. Two part repair, first grind down the 8 fins on each caliper from the outer edge of the caliper to about 3/4 inch inward untill the fins are flush with the caliper. This grinding took the longest, I used a die grinder with a sanding disc to removed the bulk of the material, then resurface discs progressively softer to polish the visable surface. Also rebalanced my wheels moving the outer weights as far outward as possible.

To come with the write up will be videos of the mounting ear and rotor grinding, and various install pictures.
 
The wheel weight issue is the same as the Baer kit. If you get your wheels rebalanced with the weights in the center of the hoop, they clear. Take a close look at our wheels there is slow point in the center.
 
Last edited:
But it is less effective to dynamic balance them with the wheel weights so close to each other and will require more weights to be added in that location.

This issue was never mentioned in this thread.
 
But it is less effective to dynamic balance them with the wheel weights so close to each other and will require more weights to be added in that location.

This issue was never mentioned in this thread.

I was just thinking about this, there's also low-profile wheel weights that are thinner than standard stick-on the wheel weights.

I don't think it was mentioned because it's hit or miss....:lol:
 
I was just thinking about this, there's also low-profile wheel weights that are thinner than standard stick-on the wheel weights.

I don't think it was mentioned because it's hit or miss....:lol:

Discount tire stores near me stock the low profile wheel weights, not sure if they all do :dunno:
 
Not to state the obvious, but the ability to locate balance weights as required across the width of the wheel to accomplish a good balance is pretty important.

If the calipers don't clear wheel weights that is a problem.
 
Not to state the obvious, but the ability to locate balance weights as required across the width of the wheel to accomplish a good balance is pretty important.

If the calipers don't clear wheel weights that is a problem.

Calipers do clear the low profile weights.........:beer:
 
Calipers do clear the low profile weights.........:beer:

Currently working on a complete write-up, but I'll wait until I return from the track tomorrow to finish it up. But to answer some key questions here and for anyone going forward for the install this weekend, here is some of my findings:Finally a big issue for me was caliper clearance aginst the wheels weights. My outer tape weights hit the fins at the end of the caliper. Two part repair, first grind down the 8 fins on each caliper from the outer edge of the caliper to about 3/4 inch inward untill the fins are flush with the caliper. This grinding took the longest, I used a die grinder with a sanding disc to removed the bulk of the material, then resurface discs progressively softer to polish the visable surface. Also rebalanced my wheels moving the outer weights as far outward as possible.

I hope you are right, I wish the best to all involved in this potential solution to Marauder braking issues. I only commented because Logizyme mentioned an issue with clearance.
 
Not sure what low profile weights are but the ones we use at work are not more than 2mm thick probably less. Worst case you static balance (inside edge only) the fronts. On a roadforce balancer you can achieve a decent static balance. Most of my cars that have had custom wheels have been balanced that way with minimal issues.
 
Not sure what low profile weights are but the ones we use at work are not more than 2mm thick probably less. Worst case you static balance (inside edge only) the fronts. On a roadforce balancer you can achieve a decent static balance. Most of my cars that have had custom wheels have been balanced that way with minimal issues.

Those would be the low profile weights sir.

The full size ones are a full 3mm. So next time she says size matters, she's right :lol:
 
Even low profiles are likely to be problematic based on my fitment, and while not as big of an issue as relocating the weights inboard, lower profile weights mean they are further spread out, also reducing the accuracy of the balance, but this is minimal and is only worth mentioning.

You've already got all your tools out for grinding, what's a few more minutes to grind down the calipers?
 
FYI every single Baer brake kit owner shares the same problem with the wheel weights.
It's a non-issue
 
FYI every single Baer brake kit owner shares the same problem with the wheel weights.
It's a non-issue

i can vouch my baer brakes have the caliper ground.

in other words stfu and deal with it (in my nice voice) :D
 
Write up

This write up is a general walk through on how to remove the existing front brakes, including caliper and bracket, rotor, pads and brake hose, and install the Zack adapter brackets, C5 calipers and pads, GT500 rotor, and TCE Zack SS hoses, along with the modifications required for fitment. Sorry for the lack of pictures at the end, I was busy working quickly so I did not loose all of my brake fluid.
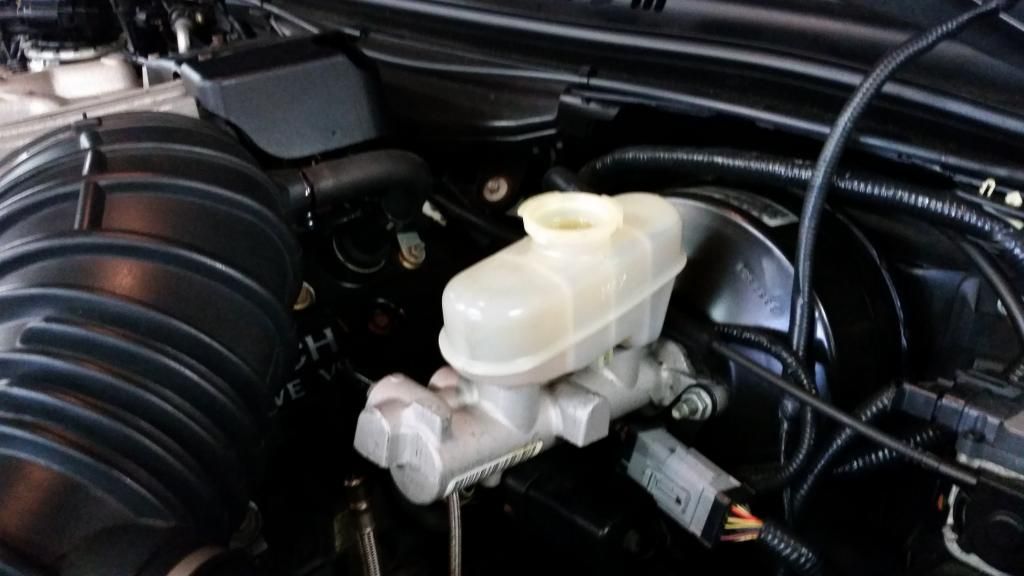
Open the hood.
Remove the master cylinder brake fluid reservoir cap.
Check and top off the brake fluid level.
*Note* brake fluid is very damaging to paint, if any is spilled on painted surfaces quickly clean with soapy water.
20140919_112807_zpsdd9a7f02.jpg

Lift the vehicle, or jack up and safely support the front of the vehicle.
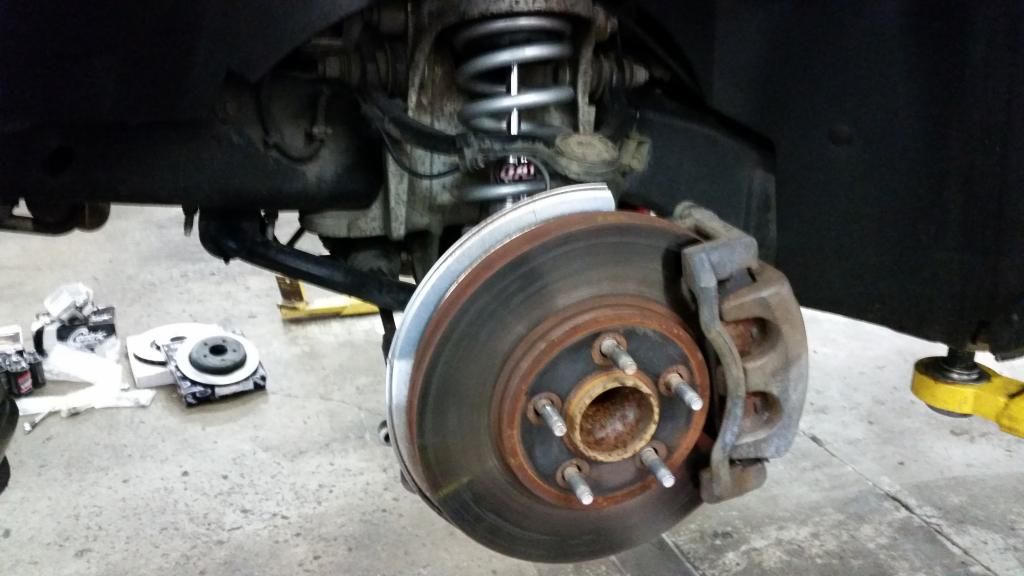
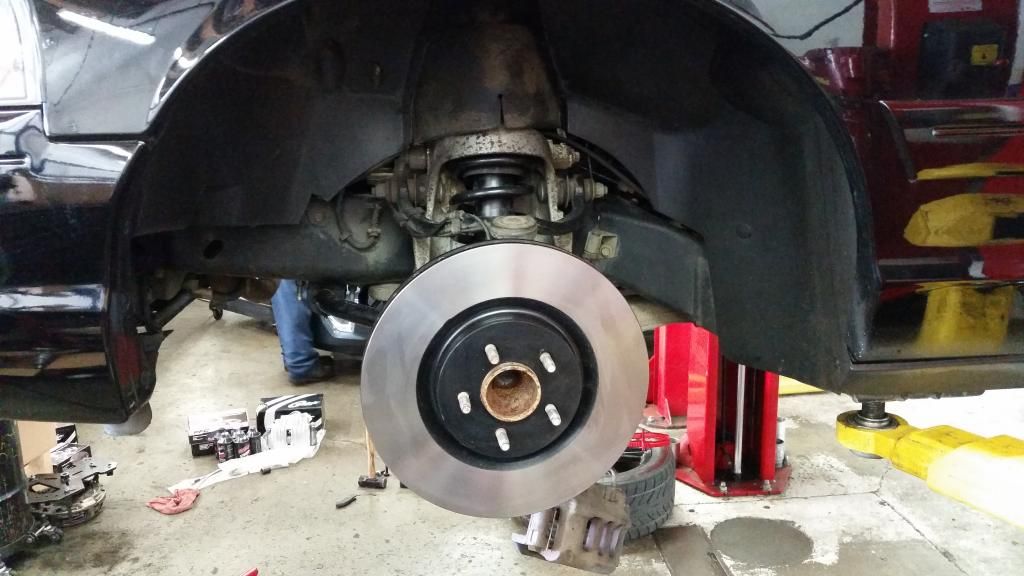
Remove both front tire and wheel assemblies.
20140919_113320_zps47fad99b.jpg

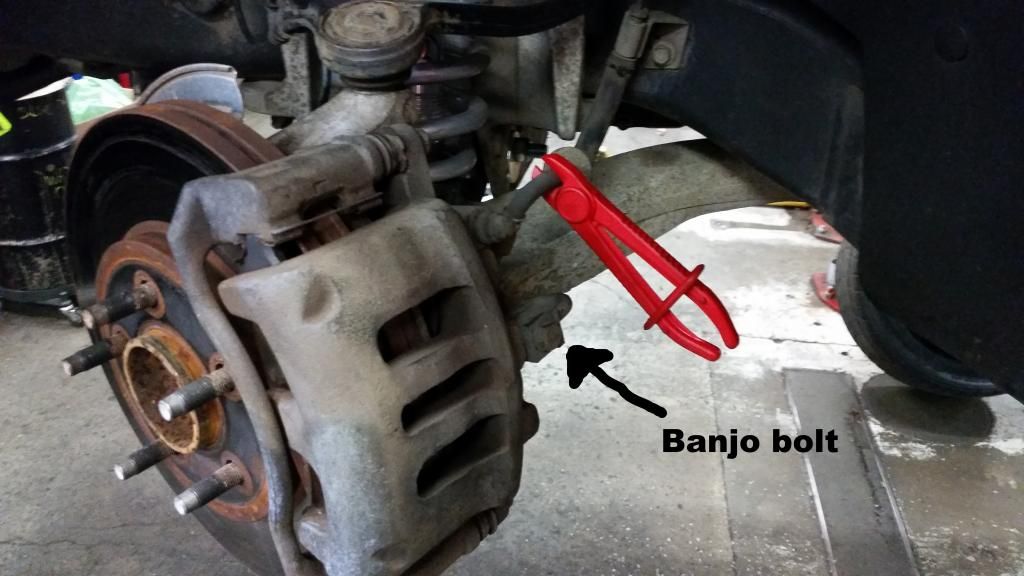
Using hose pinch off pliers, pinch off both front brake hoses.
Remove the brake hose to caliper banjo bolt.
Repeat on the other side.
e7952a0f-d53e-4822-80db-9c77c7096c57_zpse8cd3374.jpg

Remove both 18mm Caliper bracket to steering knuckle bolts.
Remove the caliper and caliper bracket assembly with pads.
Repeat on the other side.
f22f51c0-2102-4f0b-a84c-d651daa135f2_zps061dca13.jpg

Remove the rotor.
Repeat on the other side.
20140919_124233_zps7e627b54.jpg

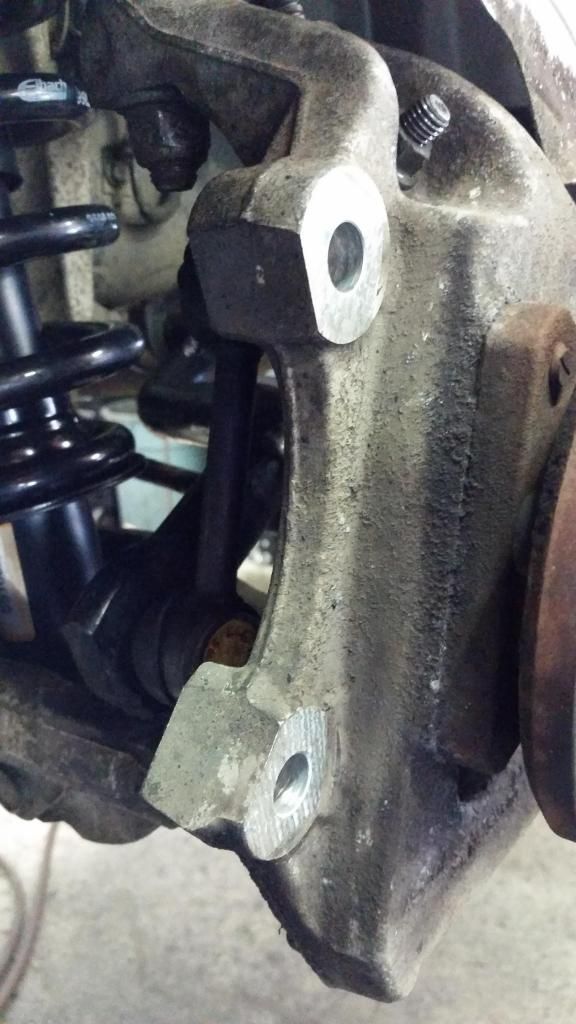
Lightly grind down the edge of the ears of the mounting holes on the steering knuckle. This will allow clearance of the Zack adapter brackets. Test fit the bracket as you grind so you only remove the minimum amount of material. Once the bolts can be threaded into the bracket this step is complete. I used a die grinder and a coarse resurface disc.
Repeat on the other side.
*Note* Eye protection and a respirator are recommended safety equipment during this procedure.
How to video
20140919_124257_zps883609ad.jpg

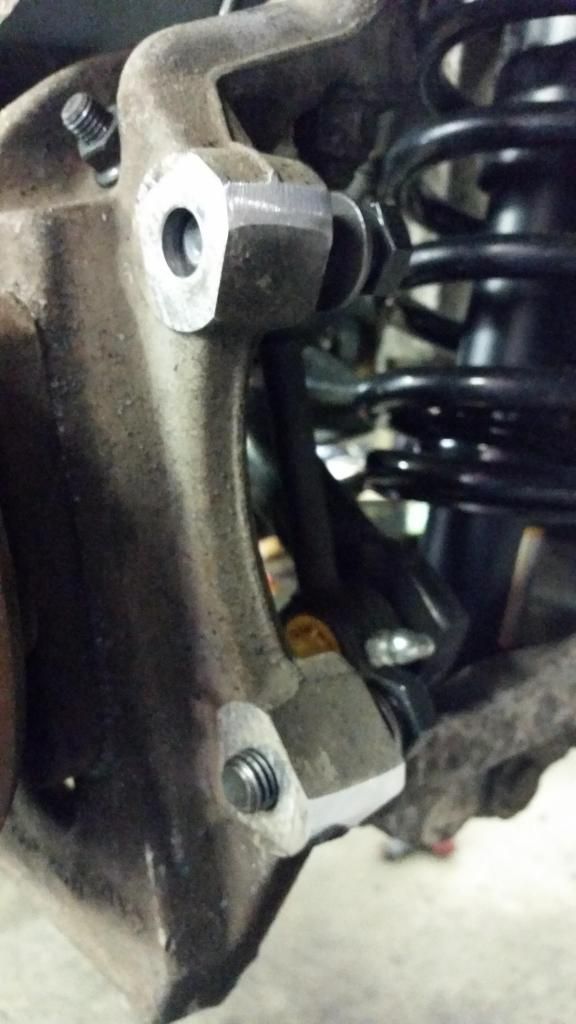
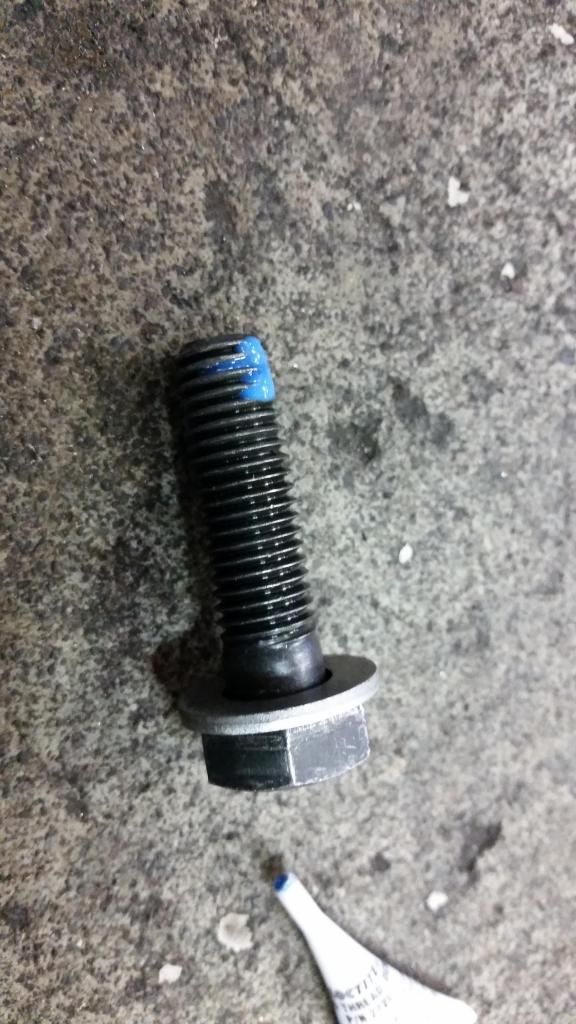
Install one washer on each of the 8 bolts included with the Zack brackets.
Liberally apply medium strength(blue) Loctite on each of the bolts.
20140919_131048_zps9129e504.jpg

Install two of the short bolts through the front of the steering knuckle, into the threaded holes of the Zack bracket.
Tighten.
Repeat on the other side.
20140919_131856_zpsb023b48b.jpg

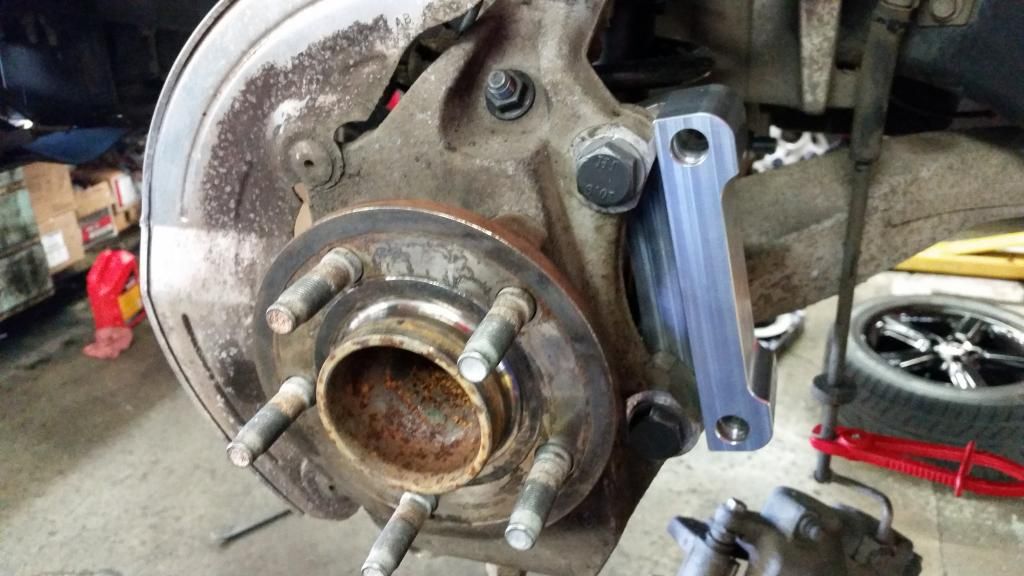
Grind the center bore of the new GT500 rotor and test fit onto the hub. Repeat grinding until the rotor slides fully onto the hub. I used a die grinder and a carbine grinding bit.
Repeat on the other side.
*Note* Eye protection and a respirator are recommended safety equipment during this procedure.
How to video
20140919_130356_zpsd9860f95.jpg

Remove the C5 caliper brackets from the calipers.
Slide the caliper bracket over the rotor.
Install two of the long bolts supplied with the Zack brackets through the back of the adapter bracket and into the caliper bracket.
Tighten the bolts.
Install the caliper hardware clips.
Install the brake pads.
Repeat on the other side.
20140919_133008_zps66dbb657.jpg

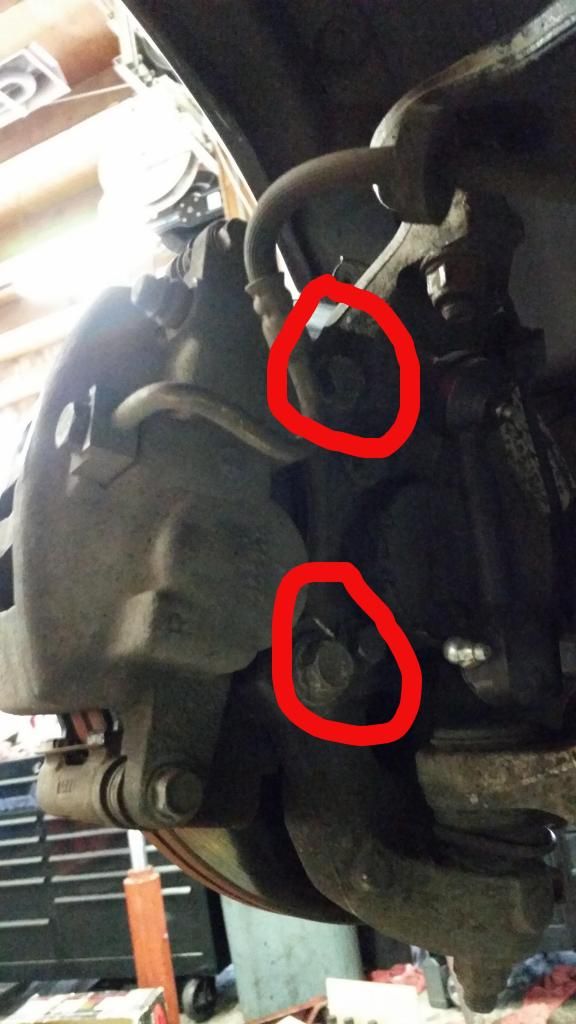
Install the caliper over the caliper bracket and pads.
Install the caliper slide pin bolts.
*Note* during the following procedures check and top off the brake fluid level frequently ensuring the brake fluid reservoir stays above the minimum line.
Loosely install the TCE brake line onto the caliper using the supplied banjo bolt and copper washers.
Using a 13mm flare nut wrench, remove the old brake hose from the hard line at the frame.
Remove the 13mm bolt holding the hose bracket to the frame.
Install the TCE supplied hose bracket to the frame using the original bolt.
Install the TCE brake hose through the bracket.
Holding the brake hose hex with a 17mm wrench, tighten the 13mm flare nut to the brake hose.
Rotate the brake hose on the caliper for best clearance and tighten the banjo bolt.
Loosen the caliper bleeder screw.
Bleed the brake fluid.
Repeat on the other side.
Clearance the wheel weights.
Install the front tire and wheel assemblies.
Test drive.
Break in the new brakes.
 
Last edited:
Back
Top